Contact Form 7 Dynamic Data Options
Get Option Values from Database
Contact Form 7 is one of major WordPress plugins to make forms. It has over five millions active installations, rated four stars. Among the ratings over one thousand are 5-star. It comes with well documentation.
Nonetheless, that does not mean it is perfect. Some people might get confused with their user interface. In my opinion, Contact Form 7 targets developers slightly over non-developers.
Thus it depends on each developer to maximize the benefit you can get from the plugin.
I was working on one project very recently. One day my client asked me “Can we manage the options of checkboxes in a manageable way?” What they mean was that they want to generate options without giving options in a form editor.
If you want to make ten options to one of checkbox group, the form tag in Contact Form 7 would look like:

But they wanted to do:

Contact Form 7 is good but it has a few drawbacks to set options in the traditional way.
- When the number of options are huge, it gets unmaintainable
- Sometimes options are liked to the data stored elsewhere in the database, like wp_posts.
- Mis-editing of options might corrupt HTML, then the entire form.
This article shows you how to dynamically generate options for checkbox, radio button, and select in Contact Form 7 on server-side using wpcf7_form_tag_data_option filter.
Basic
It can be difficult for non-developers to follow the next process, but if you are a developer, it is as easy as it is.
Tag
First, to dynamically generate options, you add data:data_type to the form tag in the form editor. For example, if you want to make options of products, the tag would be:
[checkbox product data:products]In Listo, the key names are defined in plural. So, I think we are better off following this customary when we define our data types.
wpcf7_form_tag_data_option
After giving data:data_type for the input field, we must add a code to parse those data types.
The filter wpcf7_form_tag_data_option is invoked every time any of [checkbox], [radio], and [select] are processed while the_content() renders the shortcode.
The usage of the filter is as follows:
function option_callback($data, $options, $args) {
	…
	return $data;
}
add_filter('wpcf7_form_tag_data_option' 'option_callback', 10, 3);
There are three arguments to be passed to the callback.
- $data: Always null.
- $options: Array of values that are tied to data: in the form editor.
- $args: Always empty string.
You might wonder why $data and $args are null and empty, which makes no sense. I don’t know the reason either but if you are really curious about it, please take look at includes/form-tag.php and modules/listo.php. These parameters are rather for future updates, I think.
Code
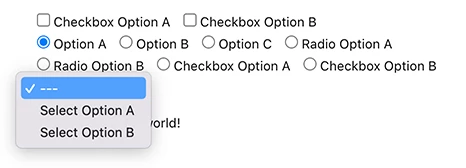
The following form and code will generate options for the three fields defined in funtions.php.
Form
[checkbox checkbox use_label_element data:checkbox_options]
[radio radio use_label_element default:1 data:radio_options data:checkbox_options "Option A" "Option B" "Option C"]
[select select include_blank data:select_options]
functions.php
add_filter('wpcf7_form_tag_data_option', function($data, $options, $args) {
	$data = [];
	foreach ($options as $option) {
		if ($option === 'checkbox_options') {
			$data = array_merge($data, ['Checkbox Option A', 'Checkbox Option B']);
		}

		if ($option === 'radio_options') {
			$data = array_merge($data, ['Radio Option A', 'Radio Option B']);
		}

		if ($option === 'select_options') {
			$data = array_merge($data, ['Select Option A', 'Select Option B']);
		}
	}
	return $data;
}, 10, 3);
This will make the next HTML.

You can add multiple data to one field. Those data options will be appended after the options defined in the form editor.
In common practice you define a callback before you call add_filter(), giving it its name. I ignore this customary for the sake of simplicity. In many real-world programming cases, I believe, theme developers won’t have to define callback functions for filters and actions because many times those callbacks are one-time use only, and will never be used again. Passing a callback function directly to the filters and actions will do the job, and result the shorter code.
Get the Latest Posts
To this point you can only make dynamic options written in the codebase, which has limited applicability. Understanding how wpcf7_form_tag_data_option works, the next step is to get some data that is stored in the database. WordPress is primarily for blogging. It is helpful to understand how to get the latest posts, then show them as options in the form.
Let’s call the data type latest_posts. WordPress has a good predefined function to get the latest posts get_posts().
The form tag in the editor and the logic in the filter will be:
Form
[checkbox post_title use_label_element data:latest_posts]functions.php
add_filter('wpcf7_form_tag_data_option', function($data, $options, $args) {
	$data = [];
	foreach ($options as $option) {
		…
		if ($option === 'latest_posts') {
			$titles = array_map(function($post) {
				return $post->post_title;
			}, get_posts());
			$data = array_merge($data, $titles);
		}
	}
	return $data;
}, 10, 3);
This will make the following HTML:

Passing ['post_type' => 'custom_post_type'] you can get any post type that can be checked and selected in the form. If you replace get_posts() with get_terms(), the possibilities of dynamic generation will be limitless, tags, colors, sizes, genres, you name it.
Next
As a bonus content, I would like to show you how to integrate this method of dynamic option generation with Advanced Custom Fields, the most popular meta field management system in WordPress.
Contact Form 7 Dynamic Data Options with Advanced Custom Fields