How to Create a Daily Scheduler with React in TypeScript - Part 1
Introduction
In this and next two tutorials, I am going to show you how to create a simple front-end daily scheduler with React in TypeScript. No extra library is used besides create-react-app --template typescript.
The daily scheduler looks like this.
It is a gantt-chart like application. Multiple schedules are plotted in 24-hour frames to one direction. Each schedule spans from one point to another based on its start and end time in the day. You create a new schedule by dragging the track of hours, and update the schedule by dragging either left or right side of rectangular schedule item shrinking or expanding. You remove a schedule by selecting an item and press the DELETE(Backspace) key.
You can see the live demo.
The tutorials are divided into three parts:
- Introduction and preparation
- Add and list
- Update, remove, and load initial data
The source code is available at GitHub.
UI Design
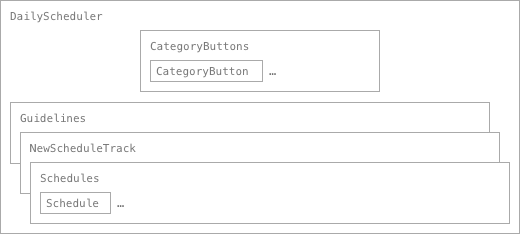
CategoryButton(s) is a component to change the category of new schedule.
Guidelines is a collection of guidelines that indicate hours in the day.
NewScheduleTrack is a draggable area to create a new schedule.
Schedule(s) is a list of schedules plotted over the guidelines.
Guidelines, NewScheduleTrack, and Schedules components are rendered at the two-dimensionally same position, different z-index.
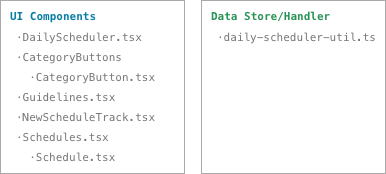
File Structure
Here is the file structure at the end:
.
├── App.tsx
├── daily-scheduler
│   ├── CategoryButton.tsx
│   ├── CategoryButtons.tsx
│   ├── DailyScheduler.css
│   ├── DailyScheduler.tsx
│   ├── Guidelines.tsx
│   ├── NewScheduleTrack.tsx
│   ├── Schedule.tsx
│   ├── Schedules.tsx
│   ├── daily-scheduler-util.ts
│   ├── index.d.ts
│   └── schedule-categories.ts
├── index.tsx
└── react-app-env.d.ts
The .tsx files are React component files that represent the UI components described in the preceding section.
The heart of daily scheduler is daily-scheduler-util.ts, in which data is stored and most of business logics regarding scheduler are written. The reasons why I don't write these logics inside React components are:
- To minimize data inheritance between components
- To separate data from UI
- To have less indentation
Conceptually, the daily scheduler works like as follows.
The tidbit is that React components shall focus on UI, no more, no less.
TypeScripting
There are basically two main types for the scheduler: ScheduleCategory and Schedule. And the Schedule type have two more variants to have front-end app work.
Schedule Category
declare interface ScheduleCategory {
  id: number;
  name: string;
  fill: string;
  stroke: string;
}
Basic data modeling of category dedicated for scheduler. Fill and stroke colors are optional. These are just for visual design to make UI emotional.
Schedule
declare interface Schedule {
  id?: number;
  title?: string;
  start: string;
  end: string;
  note?: string;
  category?: ScheduleCategory;
  category_id?: number;
  user_id?: number;
}
General schedule data modeling to be stored in database. The title, note, and user_id properties are not used in our scheduler app.
In addition to general Schedule interface, we will have two more types of schedule.
declare interface ScheduleItem {
  id?: number;
  start: number;
  end: number;
  category: ScheduleCategory;
  category_id: number;
}
While Schedule is a data model handled by both front and back end, in which start and end are stored as timestamp or datetime string, ScheduleItem is only for front-end. The start and end of ScheduleItem are x-coordinates at where the schedule should be plotted relatively to the parent element. We will have to write a function to transform a timestamped Schedule into x-coordinated ScheduleItem in the part three.
It might not be the good practice to have two interfaces Schedule and ScheduleItem because the difference is vague. I could name ScheduleItem more descriptively but I decided on the short term.
declare interface ScheduleItemIndexable extends ScheduleItem {
  index: number;
}
This is an extension of ScheduleItem which contains an index number in the array. Having ScheduleItem index, the implementation of updating and removing schedule will be slightly easier to select a target item from the array.
Getting Ready
Please follow the next steps:
- Go to GitHub repository
- Download the source code
- Copy the 01-intro directory
- Navigate to the new directory
- Install Node packages
Now you are ready.
The source code uses yarn for package management.
The 01-intro contains a source code that have been implemented the CategoryButton(s) which change the category of new schedule. This is a basic state/setState behavior on click. I assume that the reader of this article don’t require an explanation how to implement this logic. So I have done the boring part for you. I want to give you only how to make a scheduler.
If you run yarn start, you will see the four buttons.

When you click the button, it will be highlighted with blue glow. That would be the category of new schedule.
Next
In the next tutorial, I am going to show you how to add an ADD feature to the scheduler.